 German 4th Army plans an attack to cut off the Ypres Salient
1 March 1915
Situation on the German Flanders Front
|
Following the unsuccessful and costly German offensive battles for Ypres in the autumn of 1914 the fighting to the east of the town had died down. During the winter of 1914/1915 both the German Army and the Allied Armies (Belgium, France and Britain) began to dig in to the positions they had established since the battles of late autumn 1914; both sides consolidated the defences of their front line to a greater or lesser extent. With this, a static situation of trench warfare came into being on the battlefields to the north, east and south of Ypres.
Until mid March 1915 the main activity on the Flanders front was between the Allied and German artillery. There was aerial bombing by Allied aircraft on towns such as Ghent, Ostende, Zeebrugge and Menin behind the German lines, and bombing by German aircraft on the British rear areas at Dunkirk and the Allied held port of Calais.
In March 1915 the German 4th Army was holding the Flanders sector of the German western battlefront. The front ran from the Belgian coast west of Ostende to the Lys sector south east of Ypres. In the battles to capture Ypres and press on to the French coast during the “race to the sea” from late September into November 1914 this army had sustained high casualties. Maintaining a defensive position from December 1914 to the end of February 1915 the German 4th Army held off small, localised French and British attacks carried out against their line mainly to the south of Ypres. In return the German infantry made only localised, small raids or attacks on the Allied front line. During January and February 1915 the German 4th Army spent the relatively quiet time bringing its divisions back up to fighting strength. Having been sent fresh reinforcements it was able to bring its companies up to numbers between 180 and 250.
Proposals for an Offensive on the Allied Ypres Salient
In March 1915 the 4th Army commander, General-Oberst Duke Albrecht of Württemberg, was considering the possibility of mounting an attack to push the enemy out of the bulge in the German line. Known to the British Army as the Ypres Salient, this bulge into the German-held territory of Flanders was referred to as the “sack” or the “Ypres Bridgehead” by German historical accounts.
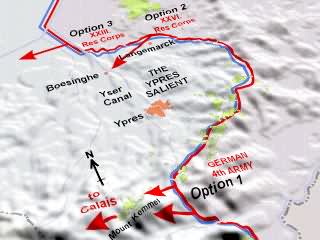
With the aim of shortening the German line to the east of Ypres Duke Albrecht was considering three options for an attack on the Allied line.
Three proposed options were:
Option 1 South of Ypres: Take Mount Kemmel
A joint offensive could be made with the neighbouring German 6th Army located to the south of 4th Army. In this operation the objective would be to take the heights of the Mount Kemmel. With the high ground at the southern end of the Ypres Salient in German hands the 4th Army commander believed it would be easy to break the Allies' hold over the Ypres Salient. Having won this important high ground, it might also then be possible to continue an advance and press on towards the Allied-held port of Calais. This offensive was shelved, however.
Option 2 North-east of Ypres: Take the Pilckem Ridge
In December 1914 the commander of XXVI. Reserve Corps, in position opposite the French Army on the northern side of the Ypres Salient, had suggested that a German offensive should capture Langemarck village, Pilckem village on its ridge of high ground, and the eastern bank of the Yser canal as far as Boesinghe railway bridge.
Option 3 North of Ypres: Capture the Yser Canal
The commander of XXIII. Reserve Corps, in position opposite
the Belgian Army on the Yser canal , proposed
that an attack should be made westwards over the Yser canal to push the
Allied line further to the west.
The Decision to Attack North-east of Ypres
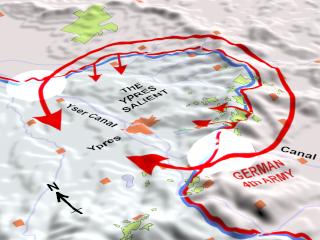
The considerations for a successful offensive on the Ypres Salient by German 4th Army were based on the fact that both at the northern end and southern end of the salient the enemy positions crossed a canal. These were considered to be key points from which German troops, who were already in positions close to each of these two points on the canal, could make an attack. In particular, the junction between the Belgian and French Armies at Steenstraat on the Yser canal at the northern corner of the Ypres Salient was considered to be a significant weak point. Here the line held by the two Allied forces was dissected by the canal. The French held the line until it reached the eastern bank of the Yser canal including Steenstraat. The Belgians held the line from the west bank of the Yser canal.
Cutting off the Allied lines where they crossed the canal north and south of Ypres would offer the possibility of drawing tight the neck of the so-called Ypres 'sack' or Ypres Bridgehead. The 4th Army commander could then make use of the tactically unfavourable situation of the Allies by trapping them inside their salient. The Germans fully expected the Allies to try to hold on to their easternmost positions in the salient for as long as they could. Gradually they would find themselves cut off from their communications and supply routes to their rear.
It was decided that a first attack on the Allied Ypres Salient should be made in the north because the distance from the German positions at the Yser canal from the town of Ypres was greater than in the south; north of Ypres the distance was about 8 kilometres, south-east of Ypres the positions at the canal crossing were about 4 kilometres from Ypres. A success in the north and subsequent movement of the German line towards Ypres would start off the gradual drawing together of the neck of the “sack”, and trap as many Allied soldiers in it as possible.
Whilst it was not the basis for the attack in the north, there was another factor to the advantage of the German attackers which was set in motion a few weeks after Duke Albrecht had made his decision; from 2nd April the French 11th Division would begin handing over the eastern sector of the Ypres Salient to the British, thereby creating a possible weak point at the junction of the two Allied armies on the north-eastern shoulder of the Ypres Salient. A German breakthrough here might split the British troops in the easternmost bulge of the salient away from the French. In addition to this, the three Allied contingents of Belgian, French and British forces then holding the northern Ypres Salient sector were to put themselves as a disadvantage by not creating a unified command structure for the control of operations by these three separate forces.
By March 1915 Duke Albrecht had decided to carry out an infantry attack proposed by XXVI. Reserve Corps at Option 2. That is, to advance in a south-westerly direction towards Ypres with the objective of capturing Langemarck, Pilckem Ridge and the eastern bank of the Yser canal as far as the Boesinghe railway bridge. The XXVII. and XV. Corps on the southern side of the Ypres Salient would be given the task of holding down the British troops there with small diversionary attacks.
Preparations in March for the Attack
Preparations for an infantry attack on the northern part of the Allied line of the Ypres Salient were set underway:
- Additional equipment was brought into the rear areas.
- A standard gauge railway was built into the Houthulst Forest from the Langemarck-Staden railway to bring up super-heavy guns.
- Many narrow gauge (60cm) field railway lines were constructed up to the front line area.
- Roads were improved using Belgian civilian labour.
- Sidings and barrack huts were built in the rear areas.
- Infantry units were taken out of the line for training.
- Temporary bridging equipment was brought into the area.
Next>> German resistance to the new gas weapon
Acknowledgements
Der Völkerkrieg, V. Band
British Military Operations: France and Belgium 1915, p. 191 (translated extract from 'Der Weltkrieg 1914-1918')